APPLICATION
PAINTER - POWERBUILDER
![]()
Objective: To describe the Powerbuilder Application Painter Environment
Please send your comments to: Raghavan
![]()
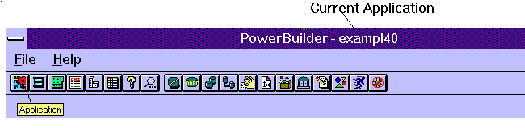
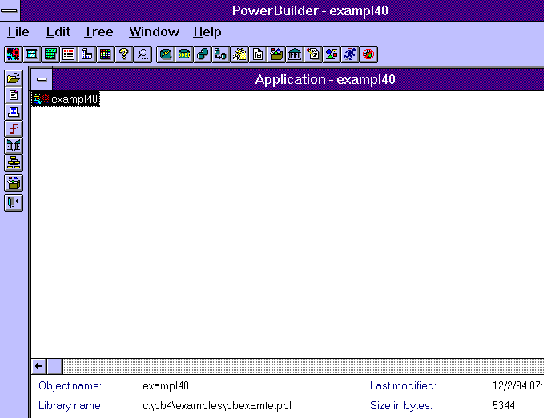
The Application Painter is
accessed through the PowerBar as shown above. There must always
be a current application opened in PowerBuilder. All work that
you do in PowerBuilder applies to the current application. When
open, the Application Painter displays the basic information
about the current application.
The Application Painter toolbar
shows at the left side of the screen by default ( this can be
modified). The toolbar contains eight (8) buttons. All of the
buttons allow you to modify application-level characteristics.
The Open button ![]() allows you to select
another application.
allows you to select
another application.
The Script button ![]() opens the script
painter for the application. There are only four events
associated with the application object. It is common to write
script for the open and closed event. In the open event you
usually set up the connection to the database and open the first
window of the application at the very least.
opens the script
painter for the application. There are only four events
associated with the application object. It is common to write
script for the open and closed event. In the open event you
usually set up the connection to the database and open the first
window of the application at the very least.
The Icon button ![]() opens the Select Icon
dialog box which allows you to select the icon for the
application. This icon will be the executable's icon that your
users will be using when the executable is installed in their
machines.
opens the Select Icon
dialog box which allows you to select the icon for the
application. This icon will be the executable's icon that your
users will be using when the executable is installed in their
machines.
The Fonts button ![]() opens the Select
Default Fonts dialog box which allows you to select the fonts
that will be the default throughout your application.
opens the Select
Default Fonts dialog box which allows you to select the fonts
that will be the default throughout your application.
The Library List button ![]() opens the Select
Libraries dialog box which allows you to add or delete libraries
from the library search path.
opens the Select
Libraries dialog box which allows you to add or delete libraries
from the library search path.
The Variable types button ![]() allows you to change
the global default variable types for the application.
allows you to change
the global default variable types for the application.
The Create Executable button ![]() allows you to create a
executable for your application.
allows you to create a
executable for your application.
All of the painter buttons have
corresponding menu items. The File menu also provides several
options for saving a modified application object:
To open a new Application,
select New from the File menu. The Select New Application Library
dialog box appears:
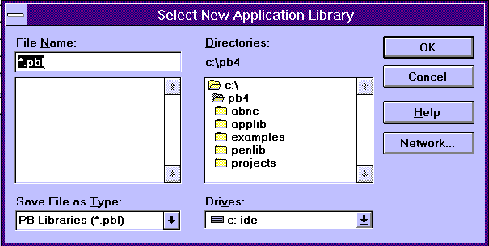
Specify the library in which
the application will be stored in the File Name box. When you
click OK the Save Application dialog box will appear:
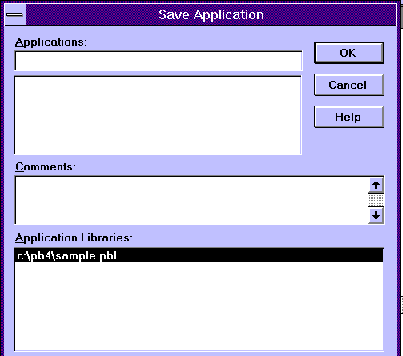
Type in the name of the application object and click OK. Your Current application will now be the new one that you just created.
![]()
Please send your comments to: Raghavan
© Dr. Vijay V. Raghavan
BACK TO Table of contents
BACK TO DATABASE Main Page
![]()