Once the Data Environment designer has been created, you can create a data report. Because all of the fields in the
data environment will be used in a report, this series of topics creates a report that displays all the fields.
To create a new data report:
- On the Project menu, click Add Data Report, and Visual Basic will add it to your project. If the designer is not on the Project menu, click Components. Click the Designers tab, and click Data Report to add the designer to the menu.
 Note The first four kinds of ActiveX designers loaded for a project are listed on the Project menu. If more than four designers are loaded, the later ones will be available from the More ActiveX Designers submenu on the Project menu.
- Set the properties of the DataReport object according to the table below:
On the Properties window, click DataSource and then click deSoundAdvice. Then click DataMember and click Customers.
Important To set the DataSource property to deSoundAdvice, the Data Environment designer must be open. If it is closed, press CTRL+R to display the Project window, then double-click the data environment icon.
Right-click the Data Report designer, and click Retrieve Structure.
Change the Report Width property in the Property Window to 9000 twips.
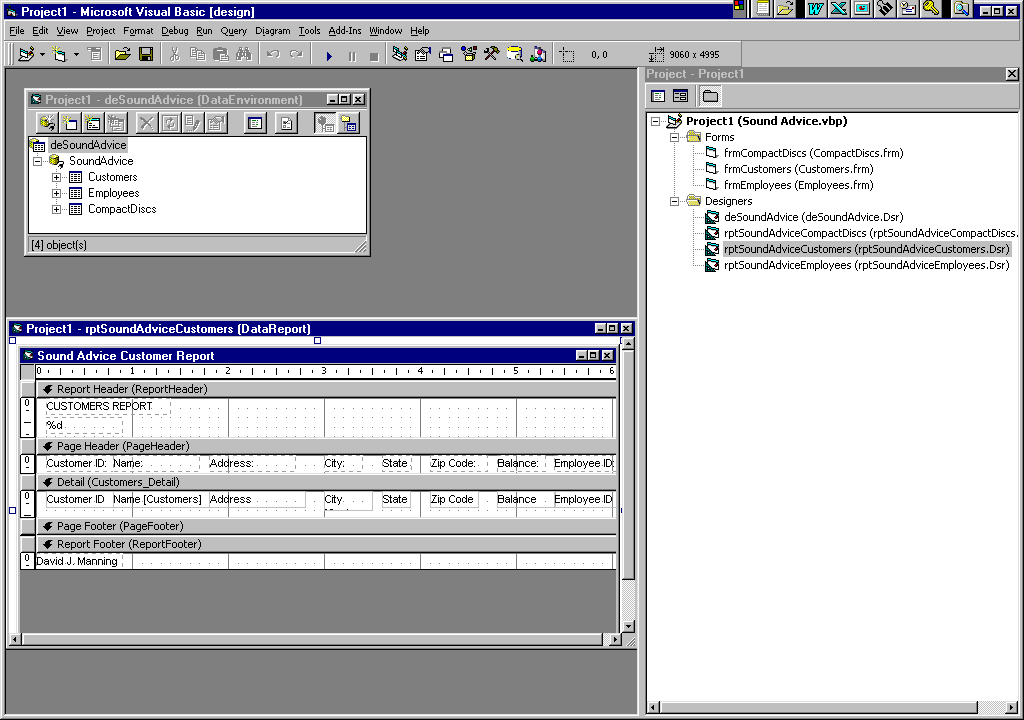
Choose the Window top-menu option and click on Tile Vertically. This will place the Data Report designer
and the Data Environment designer
on the screen next to each other. Move and close other windows on your screen accordingly to provide the best working environment.
From the Data Environment designer, drag the Customer ID field (under the Customers command) onto the Detail (Customers_Detail) section.
The Detail (Customers_Detail) section can contain any field from the Customers command.
Move the Label control (leftmost Customer ID box) (RptLabel) named Label1 to Page Header (PageHeader) section right above the Customer ID field in the Detail (Customers_Detail) section.
If you do not want a Label control to be included with the TextBox control, you can uncheck the Drag and Drop Fields Caption option on the Field Mapping tab of the
Data Environment designer's Options dialog box.
From the Data Environment
designer, drag the Name field (under the Customers command) onto the Detail (Customers_Detail) section. Move the Label control (leftmost Name box) RptLabel) named Label2 to Page Header (PageHeader) section right above the Name field in the Detail (Customers_Detail) section.
From the Data Environment designer, drag the Address field (under the Customers command) onto the Detail (Customers_Detail) section. Move the Label control (leftmost address box) RptLabel) named Label3 to Page Header (PageHeader) section right above the Address field in the Detail (Customers_Detail) section.
From the Data Environment designer, drag the City field (under the Customers command) onto the Detail (Customers_Detail) section. Move the Label control (leftmost City box) RptLabel) named Label4 to Page Header (PageHeader) section right above the City field in the Detail (Customers_Detail) section.
From the Data Environment designer, drag the State field (under the Customers command) onto the Detail (Customers_Detail) section. Move the Label control (leftmost State box) RptLabel) named Label5 to Page Header (PageHeader) section right above the State field in the Detail (Customers_Detail) section.
From the Data Environment designer, drag the Zip Code field (under the Customers command) onto the Detail (Customers_Detail) section. Move the Label control (leftmost Zip Code box) RptLabel) named Label6 to Page Header (PageHeader) section right above the Zip Code field in the Detail (Customers_Detail) section.
From the Data Environment designer, drag the Balance field (under the Customers command) onto the Detail (Customers_Detail) section. Move the Label control (leftmost Balance box) RptLabel) named Label7 to Page Header (PageHeader) section right above the Balance field in the Detail (Customers_Detail) section.
From the Data Environment designer, drag the Employee ID field (under the Customers command) onto the Detail (Customers_Detail) section. Move the Label control (leftmost Employee ID box) RptLabel) named Label8 to Page Header (PageHeader) section right above the Employee ID field in the Detail (Customers_Detail) section.
To put the title in the Report Header (ReportHeader) section on the report perform the following steps. Right-click in the Report Header (ReportHeader) section of the report on the short-cut menu point to Insert Control then click on Report Title. This will put the title control in the Report Header (ReportHeader) section of the report. Change the Caption property of the control in the property window to read "CUSTOMER REPORT". To put the date in the Report Header (ReportHeader) section to appear under the CUSTOMER REPORT header on the report perform the following steps. Right-click in the Report Header (ReportHeader) section of the report on the short-cut menu point to Insert Control then click on Current Date (Short Format). This will put the date control in the Report Header (ReportHeader) section of the report. Increase the width of this report band and drag the date control under the CUSTOMER REPORT header. See page VB 6.68 of your book to see the correct format of the report header and the detail lines of the report.
To put your name, class, and section number in the Report Footer (ReportFooter) section on the report perform the following steps. Right-click in the Report Footer (ReportFooter) section of the report on the short-cut menu point to Insert Control then click on Label. This will put a label control in the Report Footer (ReportFooter) section of the report. Change the Caption property of the control in the property window to read "your name IFS 110 section number".
Resize the Data Report designer's sections to use as little space as possible in each of the report bands.
It's important to resize the height of the Details section to be as short as possible because the height will be multiplied for every record in the Sound Advice database. Any extra space below or above the detail line text boxes will result in unneeded space in the final report.
Save the project.
 Note The first four kinds of ActiveX designers loaded for a project are listed on the Project menu. If more than four designers are loaded, the later ones will be available from the More ActiveX Designers submenu on the Project menu.