Step 3: Create a Simple Data-Bound
Form
Once you've created a
Command object in a Data Environment designer to serve as a data source, you can easily
create a data-bound form by dragging the
Command object onto a
blank form. You can then add a mechanism for navigating through
the records that are displayed.
In this topic, you'll create a form that
displays records from the Phone table in the Employees sample
database. Then you'll create command buttons for moving to the
next or previous record.
To create a simple data-bound form
- Drag a Command object from the Data Environment designer to a blank form.
- Create Select Menu Options that lets you
navigate through records.
Drag Command Object from Data Environment
Designer to a Blank Form
Much of the tedium of creating a data-bound
form can be avoided in Visual Basic by dragging a
Command object
from the Data Environment designer to the form. Visual Basic
automatically creates text box controls to display data from the
Command object's recordset and sets data properties that bind the
controls to fields in the recordset.
 For example, to create a form that displays
data from the Phone table in the Employees sample database follow
the steps in the "Create a Data Environment Command Object"
topic to create an EmployeesTable command. Then simply drag the
Command object (EmployeesTable) from the Data Environment
designer onto a blank form. To view both the form and data
environment simultaneously so you can perform the drag operation,
select Tile Horizontally, Tile Vertically, or Cascade from the
Window menu.
For example, to create a form that displays
data from the Phone table in the Employees sample database follow
the steps in the "Create a Data Environment Command Object"
topic to create an EmployeesTable command. Then simply drag the
Command object (EmployeesTable) from the Data Environment
designer onto a blank form. To view both the form and data
environment simultaneously so you can perform the drag operation,
select Tile Horizontally, Tile Vertically, or Cascade from the
Window menu.
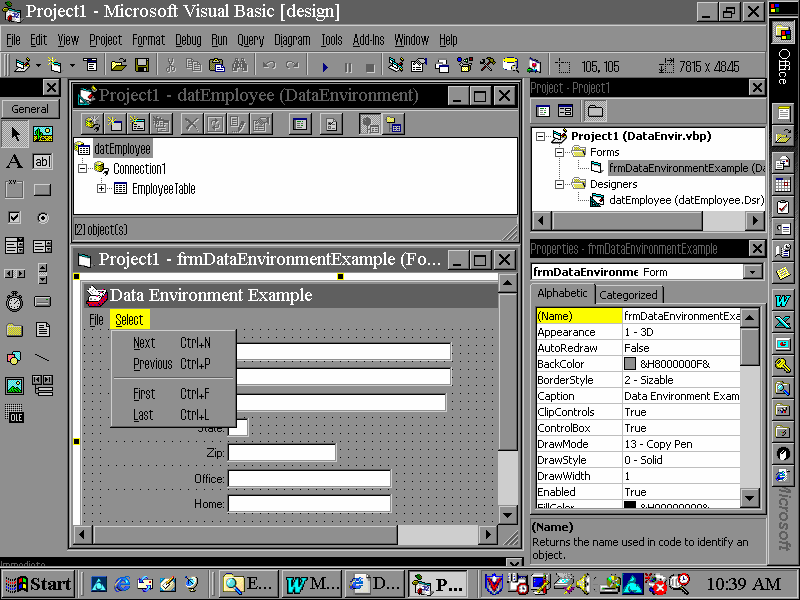
Create Menu Options to Navigate through
Records
By basing a data-bound form on a data
environment Command object's recordset, you can easily create
Next and Previous options on a Menu that let you navigate through
records. Each menu option requires the following lines of code.
For example, to create a Next Menu option for
the form that displays Employees records, add a Select Menu which
includes the Next, Previous, First, and Last options to the form.
Change Next Menu's Caption property to Next and its Name
propery to mnuNext. Then add the following code to menu’s
mnuNext_Click event procedure:
datEmployeesEnvironment.rsEmployeesTable.MoveNext
IF datEmployeesEnvironment.rsEmployeesTable.EOF then
   datEmployeesEnvironment.rsEmployeesTable.MoveFirst
END IF
The code uses the MoveNext method of the
EmployeesTable command's underlying recordset, rsEmployeesTable.
It refers to the recordset as a property of the command's data
environment designer, datEmployeesEnvironment.
Similarly, you can create a Previous Menu
Option by adding a Previous Menu Option of the Select Menu to the
form and change its Caption property to Previous and its
Name property to mnuPrev. Then add the following code to the menu’s
mnuPrev_Click event procedure:
datEmployeesEnvironment.rsEmployeesTable.MovePrevious
IF datEmployeesEnvironment.rsEmployeesTable.BOF then
   datEmployeesEnvironment.rsEmployeesTable.MoveLast
END IF
When you run the form, Visual Basic displays
the records in the Employees table and lets you move forward and
backward through the recordset by using the Select Menu.
Note: Use the same
coding methods for the First
and Last record options
on the Select Menu.
|
Assignments |
Hints |
Outputs |
Requirements |