|
If the Data Environment designer is not available on the Project menu, add it to your Visual Basic environment. Click Components on the Project menu, click the Designers tab, and then click the check box next to its name in the list of designers. |
 |
| Assignments | Hints | Outputs | Requirements |
When you work with data in a Microsoft Access database, you must first create a connection to a database file. The easiest way to create a connection to a Microsoft Access file is to create a data environment using the Data Environment designer.
This topic shows how to create a connection to the Phone List sample database (Employees.mdb). It assumes that the database file is located on the Student Disk downloaded from the publisher site by using the back cover of the text.
To create a connection to a Microsoft Jet/Microsoft Access database file
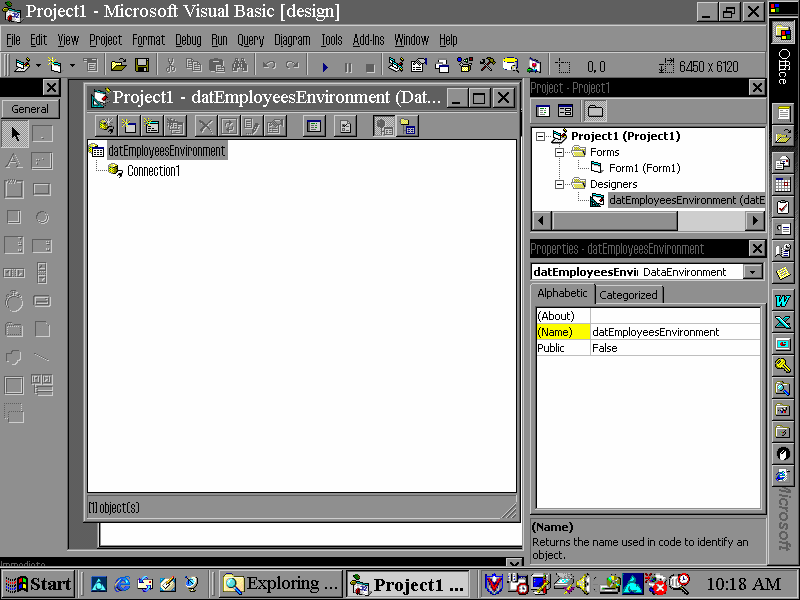
A Data Environment designer provides an easy way to create connections to many types of databases. To add a designer to your project, click Add Data Environment on the Project menu. Visual Basic loads a data environment and adds a Connection object to the data environment. Click the DataEnvironment1 icon in the Data Environment Window, change its name property in the property window to datEmployeesEnvironment and press Enter key.
|
If the Data Environment designer is not available on the Project menu, add it to your Visual Basic environment. Click Components on the Project menu, click the Designers tab, and then click the check box next to its name in the list of designers. |
|
Note The first four kinds of ActiveX designers loaded for a project are listed on the Project menu. If more than four designers are loaded, the later ones will be available from the More ActiveX Designers submenu on the Project menu.
|
You establish the connection to your data source by setting properties in the Data Link Properties dialog box. To display this dialog box, right-click the Connection object in your data environment and then choose Properties from the shortcut menu. Select an OLE DB provider on the Provider tab of the dialog box. Then click Next and enter connection information on the Connection tab of the dialog box. The layout of the Connection tab varies, depending on the OLE DB provider you select on the Provider tab. |
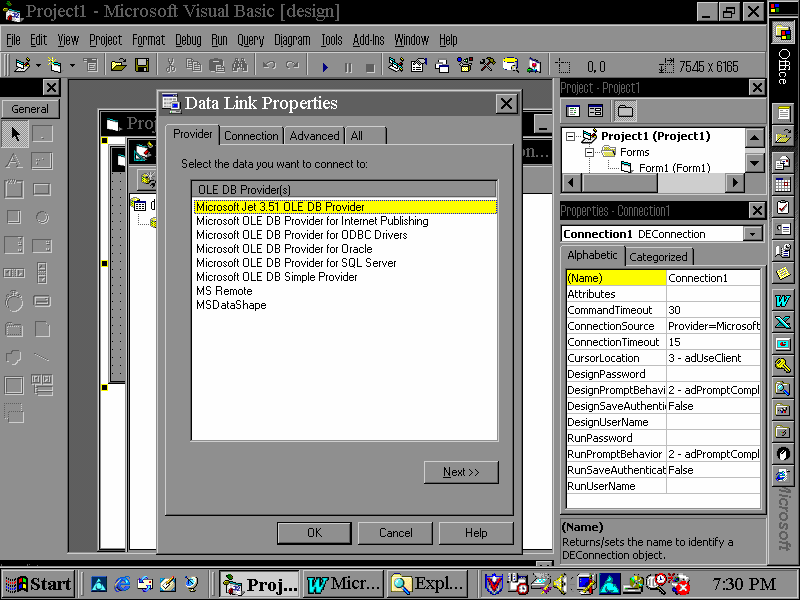 |
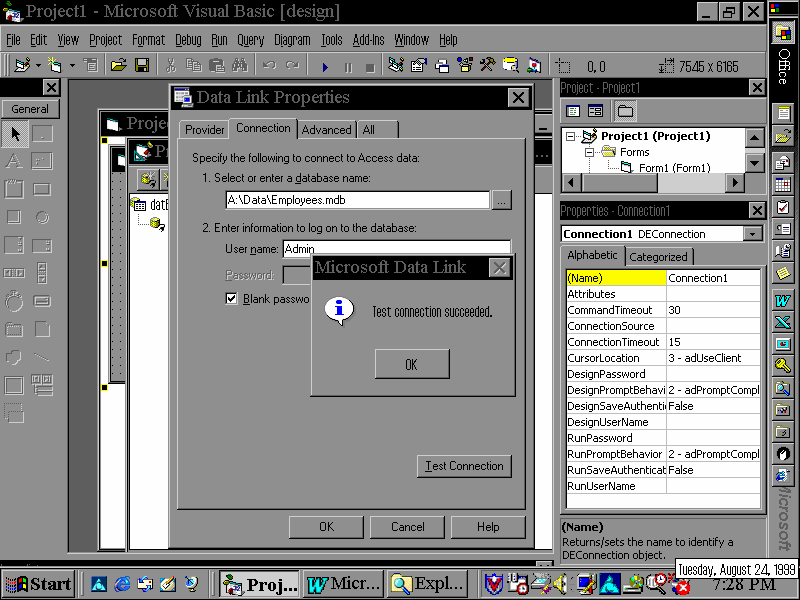
For example, to connect to a Microsoft Jet/Microsoft Access database such as the Employees sample database, select the Microsoft Jet 3.51 OLE DB provider on the Provider tab. On the Connection tab, enter the path to the database file; for example:
You can test the connection by clicking Test Connection Button. |
 |
Once you've created a connection to your database, you can use the Data Environment designer to create Command objects that give you access to data. For example, you can create a simple Command object that gives you access to the data in a table, or a more complex Command object based on a query.
You can then use a data environment Command object as a data source in your application. First, you'll create a simple Command object based on the Phone table in the Employees sample database.
To create a simple data environment Command object
You can open an existing Data Environment designer or create a new one. To open an existing one, click Designers in the Project window, and then double-click the name of the designer. To create a new one, follow the instructions in the "Create a Connection to a Microsoft Access Database File" topic.
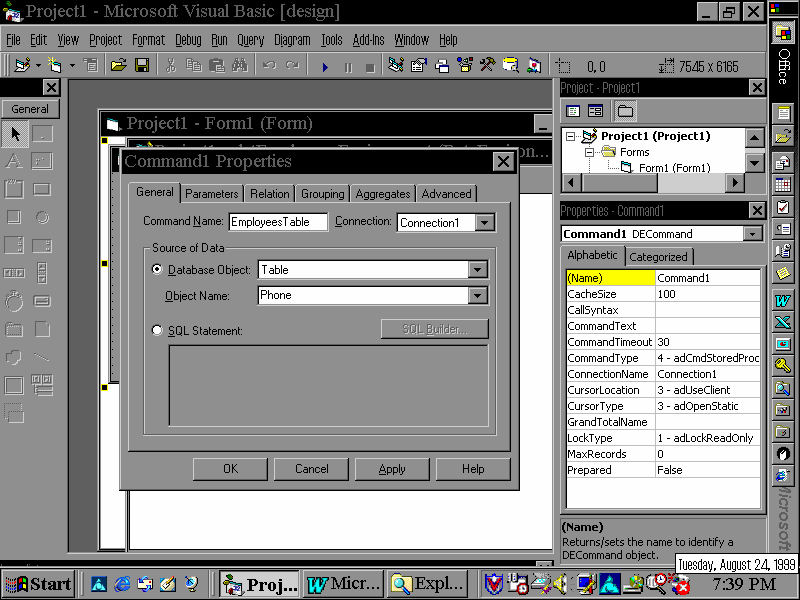
Create a data environment Command object by clicking the Add Command button on the Data Environment designer toolbar, or by right-clicking the connection in the data environment window and choosing Add Command from the menu. You can then specify the Command object's name, the connection it uses, and the source of its data in the Command Properties dialog box. To display this dialog box, right-click the Command object in your data environment and then choose Properties from the shortcut menu.
| For example, to create a Command object based on the Phone table in the Employees sample database, set the following properties: | 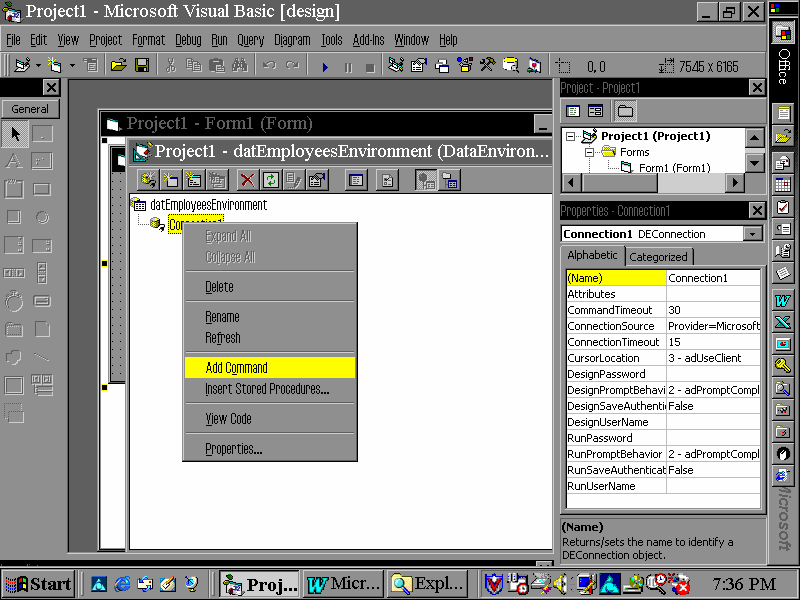 |
| Property | Setting |
| Command Name | EmployeesTable |
| Connection | Connection1 |
| Database Object | Table |
| Object Name | Phone |
|
When you click OK, the Data Environment designer displays the Command object and its underlying fields in a hierarchical view in the Data Environment designer window. Click the + to the left of the EmployeesTable icon in the Data Environment designer window to see the fields in the Employees database. |
 |
The Data Environment designer also creates a Recordset object to represent the records returned by the Command object. The Recordset object uses the same name as the Command object but adds an "rs" prefix. For example, when the Data Environment designer creates the EmployeesTable command, it also creates a Recordset object called "rsEmployeesTable."
You can refer to the Command object in code as a method of the data environment, and refer to its recordset as a property of the data environment. For example, if you have created the EmployeesTable command in a data environment called "datEmployeesEnvironment," you can refer to the command in code as follows:
datEmployeesEnvironment.EmployeesTableYou can refer to the Command object's underlying recordset as follows:
datEmployeesEnvironment.rsEmployeesTableAfter you create the Command object, the Auto List Members feature and Object Browser display the command method and recordset property along with the other properties and methods of the data environment.
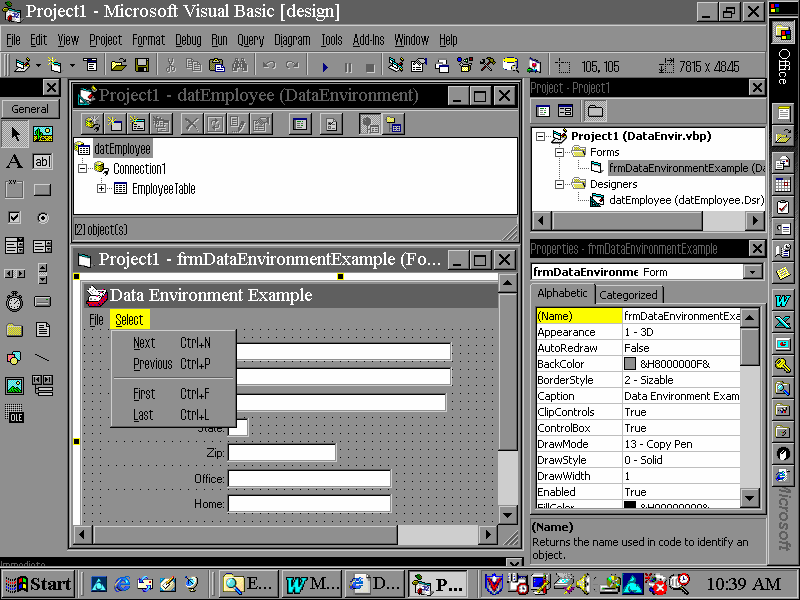
Once you've created a Command object in a Data Environment designer to serve as a data source, you can easily create a data-bound form by dragging the Command object onto a blank form. You can then add a mechanism for navigating through the records that are displayed.
In this topic, you'll create a form that displays records from the Phone table in the Employees sample database. Then you'll create command buttons for moving to the next or previous record.
To create a simple data-bound form
Much of the tedium of creating a data-bound form can be avoided in Visual Basic by dragging a Command object from the Data Environment designer to the form. Visual Basic automatically creates text box controls to display data from the Command object's recordset and sets data properties that bind the controls to fields in the recordset.
 For example, to create a form that displays
data from the Phone table in the Employees sample database follow
the steps in the "Create a Data Environment Command Object"
topic to create an EmployeesTable command. Then simply drag the
Command object (EmployeesTable) from the Data Environment
designer onto a blank form. To view both the form and data
environment simultaneously so you can perform the drag operation,
select Tile Horizontally, Tile Vertically, or Cascade from the
Window menu.
For example, to create a form that displays
data from the Phone table in the Employees sample database follow
the steps in the "Create a Data Environment Command Object"
topic to create an EmployeesTable command. Then simply drag the
Command object (EmployeesTable) from the Data Environment
designer onto a blank form. To view both the form and data
environment simultaneously so you can perform the drag operation,
select Tile Horizontally, Tile Vertically, or Cascade from the
Window menu.
By basing a data-bound form on a data environment Command object's recordset, you can easily create Next and Previous options on a Menu that let you navigate through records. Each menu option requires the following lines of code.
For example, to create a Next Menu option for the form that displays Employees records, add a Select Menu which includes the Next, Previous, First, and Last options to the form. Change Next Menu's Caption property to Next and its Name propery to mnuNext. Then add the following code to menu’s mnuNext_Click event procedure:
datEmployeesEnvironment.rsEmployeesTable.MoveNext
IF datEmployeesEnvironment.rsEmployeesTable.EOF then
   datEmployeesEnvironment.rsEmployeesTable.MoveFirst
END IF
The code uses the MoveNext method of the EmployeesTable command's underlying recordset, rsEmployeesTable. It refers to the recordset as a property of the command's data environment designer, datEmployeesEnvironment.
Similarly, you can create a Previous Menu Option by adding a Previous Menu Option of the Select Menu to the form and change its Caption property to Previous and its Name property to mnuPrev. Then add the following code to the menu’s mnuPrev_Click event procedure:
datEmployeesEnvironment.rsEmployeesTable.MovePrevious
IF datEmployeesEnvironment.rsEmployeesTable.BOF then
   datEmployeesEnvironment.rsEmployeesTable.MoveLast
END IF
When you run the form, Visual Basic displays the records in the Employees table and lets you move forward and backward through the recordset by using the Select Menu.
Note: Use the same
coding methods for the First
and Last record options
on the Select Menu.
| Assignments | Hints | Outputs | Requirements |